top of page

Sebastion Gallo

 Stefanie Suarez

 Kenny Goodrich

 Rochan Ramesh

 Ayako Sakuma

Natalie Leek

Lab Notes August 31st, 2016:

Today, we made PCR products and ran the PCR for the IRA2 gene. PCR is a polymerase chain reaction that amplifies a segment of DNA. We used this process to amplify the DNA of the yeast Saccharomyces cerevisiae to locate a piece of DNA with a double strand break at our gene. To complete this process we combined the solutions listed below and calculating the necessary amount of our gene and water to bring the solution up to 50 microliters. To create this solution one group created a "master batch" with the basic ingredients and the other groups added their specific primers, template DNA, and water. Once we created our solution, we vortexed it (shown to the right) and took it to the PCR room.

Vortex.

Watch us vortex our PCR mix above.

Lab Notes September 7th, 2016:

Today, we discussed how to determine whether or not our PCR gene was successful. We found that by running gel electrophoresis we could see if it worked. Later in class, we talked about how to avoid contamination when growing yeast on our plates (pictured in the photo to the left). We determined that by washing our hands, wearing gloves, tying hair back, sterilizing all tools and our work area with ethanol and clean paper towel, and switching pipette tips we would theoretically be able to avoid contamination. At the end of class, we plated our yeast into our Petri dishes to allow it to grow after sectioning each one into fourths.

Lab Notes September 12th, 2016:

Today, we transformed our yeast by the lithium acetate method. First, we centrifuged the dilution of yeast at 6000 RPM for five minutes. Then we removed the supernatant and washed the pellet with 1mL of autoclaved water. The cells were then vortexed and centrifuged for five more minutes. After centrifuging, we removed all of the H20 and suspended the pellet in 200uL of 100mM of LiAc solution and incubated it at 30 degrees Celsius for ten minutes. Then we centrifuged it at 6000 rpm for 30 seconds and added the following ingredients:

a. 36 uL of 1 M LiAc

b. 25 uL of salmon sperm DNA

c. 50 uL of plasmid DNA + water

d. 240 uL of 50% PEG

e. 30 uL DMSO

We then mixed the contents by vortexing and incubated it at 30 degrees Celsius for 30 minutes and 42 degrees Celsius for 20 minutes. We then pelleted the cells for 5.5 minutes at 8600 RPM and removed all supernatant. Finally, we resupended the pellet in ddH2O and plated the yeast cells in and SD media plate.


Lab Notes September 14th, 2016:

Today, each of the groups in our lab presented about their projects. Click on the link above to see our presentation. We learned that we need to have less wordy slides and we need to do more research about the fundamental function of our chosen gene. Then we worked on a worksheet entitled "Microbial growth in batch cultures". At the end of class, we carried out a serial dilution, a stepwise dilution of a substance in solution, with our saturated yeast culture.


PCR NEWS.

September 18, 2016

This weekend, group three got together to create this video. Check it out to learn more about genetic modification and the role PCR plays in this process!

Lab Notes September 19th, 2016:

Today, we attempted to figure out how to make a YPD media. To do this we had to determine the necessary concentration of dextrose. Below is a picture of our calculations that led us to the conclusion that we need 0.002 M dextrose. After completing these calculations, we did a serial dilution with our yeast in order to measure the density of the yeast at the spectrometer. Then we measured it at the spectrometer and got the values of the optical density and plotted on an excel graph. Finally, we autoclaved our the YDP media in which we will grow our yeast to eliminate contamination.

Lab Notes September 21st, 2016:

Today, we worked on our experimental design. First, we finalized our hypothesis: "If we remove the IRA2 gene in Saccharomyces cerevisiae, the morphant yeast will exhibit a less efficient response to stress than the non-morphant yeast. This will include the morphant yeast having lower survivability and growth rate than the non-morphant yeast when subjected to extreme temperature change." Next, we began developing the methodology we would use to test our hypothesis. We decided to subject six plates of non-mutant yeast and six plates of mutant yeast to three different temperatures (room temperature, 30 degrees Celsius and 37 degrees Celsius) using incubators and solid agar plates. We will measure the growth of the different strains in the various temperatures by measuring the radius. We will also use a 96 well plate to subject the strains to three different pHs (2, 4, and 8) using liquid YPD media and put the yeast strains competition using a serial dilution. We will then measure the growth rate of the yeast in competition using fluorescence activated cell sorting (FACS), a process which sorts live and dead cells into separate colors and containers by measuring cell diameter. This will be done in three cycles of 24 hours. We will then quantify and analyze our results.

Lab Notes September 26th, 2016:

Today, we microwaved the liquid YPD containing agar until it liquefied so it could be poured into our plates.   Then we took a break to watch the third presentations of the semester (check ours out below). We learned that we need to increase the volume of our dilutions to allow the yeast to grow. We also learned to make better use of the visuals included on our slides and to avoid long strings of letters when giving oral presentations. After our presentations, we poured our liquid YPD containing agar into plates and allowed it solidify. We will use these plates to subject our yeast to changes in temperature and measure the growth rates of the mutated and wild-type strains. Finally, we plated our yeast on to our agar plates, preparing them for incubation. 


PSA.

September 28, 2016

WARNING: At the end of class on September 26, 2016, we plated our yeast on to YPD agar plates and prepared it to be incubated. Unfortunately, on September 28, 2016, we discovered that because we moved our yeast too quickly after plating it, it spread around our plates and we are now unable to accurately measure the diameters of the cultures. This is a public service announcement to other groups, take extreme caution in moving you plates until the culture has had sufficient time to soak in and will stay in the original shape.

Lab Notes September 28th, 2016:

Today, we were able to come up with a solution to our mistake with the original plating of our yeast. We marked specific areas on the plates (equivalent a quarter in size), where the original yeast hadn't spread, in which to incubate another round of culture on the YPD. We plated the next round of yeast and left the plates to sit so the culture would have sufficient time to soak in. Then, we worked on our 96 well plates in which we will be subjecting our yeast to various pHs and to competition. In the first section, we pipetted 90 microliters of 2.98 pH liquid YPD in 24 wells, in the next section we pipetted in 90 microliters of 5.00 pH liquid YPD in 24 wells, and in the final section, we pipetted 90 microliters of 8.99 pH liquid YPD in 24 wells (the pH solutions are pictured to the right). Then, we added 10 microliters of the wild-type yeast to half of these wells and 10 microliters of the mutant yeast to the other half. Next, we had to figure out the necessary dilution factor to measure our yeast strains in competition. We found that the necessary dilution factor for 10 generations of our yeast is 2^-10, which we will achieve using a serial dilution of 1/4, 5 times. We began the serial dilution by adding 25 microliters of yeast to 75 microliters of liquid YPD. Then we diluted the yeast by 1/4 by taking 25 microliters of this original mixture and diluting it with 75 microliters of liquid YPD. We repeated this process five times in total.


Lab Notes October 3rd, 2016:

Today, we began class by discussing some of the most common mistakes made in the rough drafts of our lab papers and how to fix them for our final draft. Then, we used powerpoint to upload pictures of our plates. We used this to compare our yeast's growth rate under various temperatures by comparing diameters. To do this we used the equation in the picture on the left, with time in hours and diameter in inches. We are still working finalizing this data. Next, we worked on a statistical analysis of the growth curve of our yeast in various pHs. We did this by plotting the time in minutes that the yeast was grown vs the optical density, which tells us how many yeast cells were present. Our growth rate (r) can be found by the finding steepest slope of each of our graphs. We repeated this process 3 times, once for each of our trials. We will then compute the r-value by finding the average slope of the three trials. One of our graphs is pictured to the left.


Lab Notes October 5th, 2016:

Today was the last day of the biology portion of our lab. We gave our final presentation, which can be viewed above. Included within the powerpoint are graphs displaying the data we collected from our experiments. We found that the wild-type grew more than the knockout under pH stress, showing that the IRA2 mutant did have a deficient response to stress. We found this data using t-tests, a statistical method of comparison. The data with the temperature was inconclusive, we believe this is because the range of temperatures we chose did not sufficiently test the yeast. Because ants got into our 96 well plate, we were unable to get data from competition.

Lab Notes October 10th, 2016:

Today was the first day of the chemistry portion of our lab. We learned that in this section we will be using wax printing, 3D printing, and PDMS to complete an experiment similar to the one in the biology portion of our lab, using the same mutant yeast and stressors. Wax printing is the process of using powerpoint to print a wax picture on filter paper and reflowing the wax so it soaks through to the back of the paper (an example wax print is pictured to the left). 3D printing and Polydimethylsiloxane (PDMS) can be used together to create a mold with an open channel through which fluid can be run and tested. All of these methods will be used to create analytical devices through which we will complete our experiment.

Lab Notes October 12th, 2016:

Today, we watched a presentation on 3D printing and learned how to use "Tinkercat", a 3D printing design website. Then, we began to work our on designs. We plan to use the wax print to create channels to grow our wild-type and mutant yeast side by side under various temperatures. The wax barriers will force the yeast to grow down the channel instead of in a circle, allowing the yeast strains to essentially "race" each other down adjacent channels. We will grow 3 of the wild-type and 3 of the mutant strains on the wax paper in room temperature, 30 degrees Celsius and 37 degrees Celsius. Before we can begin experimenting we have to optimize our channel widths. To do this, we created a design (pictured to the left) comparing channels with widths ranging from 0.1 inches to 0.5 inches (increasing by 0.02 inches) and lengths of 4.5 inches. We created our design on a word document and then we cut filter paper and used a wax printer, ColorQub8580n PS, to print out our design (pictured to the left). After we created our print, we had some homework to do. Over the weekend, we were challenged with finding out how to melt our wax through to the other side of the paper and how to keep our paper sterile so that only the yeast grows, not other bacteria. 

Lab Notes October 17th, 2016:

Today, we gave our first presentation for the chemistry portion of our lab, detailing the plan for our upcoming experiment. Check it out at the link below! We found answers the questions that were posed at the end of class last Wednesday. To melt our wax we discovered that we needed to use a hot plate, and to keep it sterile we decided we will treat the paper with ethylene oxide and autoclave the paper (at 120 degrees Celsius) while submerged in water. We also created a rough plan for the 3D print portion of our experiment (pictured to the left). Then, we continued optimizing our wax print. We placed the print we made in the last lab (pictured above) directly on a hot plate at 100 degrees Celsius and covered it in tin foil, applying pressure to the edges, to allow the wax to melt through to the other side of the paper. Next, we covered the back of the paper in clear nail polish to create a hydrophobic barrier that would prevent the agar from seeping through. Through research, we found that the chemical composition of the nail polish would not have any adverse effects. When the paper was dry, we autoclaved solid YPD agar media and treated our paper with it. This process is shown in the video to the right.

optimize.

Watch us treat our wax paper with solid agar.

all dried up.

October 19th, 2016

When we went to plate yeast on our optimization sheet today, we discovered that the agar we plated during our last lab had dried out. Additionally, it was not smooth because when we poured it the agar was too viscous because of its low temperature. To circumvent this issue, we filled a beaker with warm water and placed our agar filled beaker within the water to keep it liquefied throughout the plating process. We also resized our optimization design so it could fit in Petri dishes, which would act as moisturization chambers.

Lab Notes October 19th, 2016:

Today, we prepared to plate yeast on our optimization sheet, but, as detailed above, it was too dry and thick. We created new optimization sheets with the same variation of widths but with channels 2 inches in length so they could fit into Petri dishes. We placed wet paper in the Petri dishes so they would act as moisture chambers and keep our agar from drying out. We printed the sheets, melted the wax through using the hot plate and applied nail polish to the back of the sheet to keep the agar from seeping through (pictured to the left). Then we plated agar on the new optimization sheets, using warm water to keep it liquified. Once the paper was treated with agar, we plated 10 microliters of our yeast at the end of each channel and placed the sheets in the Petri dishes. We will allow the yeast to grow until Monday when we will decide which channel width will provide the most optimal growth environment for our yeast.

Lab Notes October 24th, 2016:

Today, we found that the agar in the moisture chamber Petri dishes we created during the last lab had dried up (pictured to the right), though they appeared to be less dry than the agar on our first optimization papers. This led us to the conclusion that the wet paper was the right idea, but we need to increase the amount of moisture in the Petri dishes. We learned that this can be accomplished by placing small Petri dishes filled with water in large Petri dishes, in which the optimization sheets can be placed. (pictured to the right). This will keep the agar from drying up and allow the yeast to grow. Despite the lack of moisture, our yeast was able to grow, as can be seen in the picture. We are hoping it will exhibit even more growth in our next optimization. We wax printed another optimization sheet with 2-inch lengths, melted it through on the hot plate that had been sterilized with ethanol, painted the back with the clear nail polish, and set up our agar the same way we did in the last optimization (in a beaker of warm water) to keep it smooth. We plated our agar and yeast on the optimization paper, filled the small Petri dishes with water, and placed the papers in the large Petri dishes to grow, and covered the dishes with parafilm to prevent evaporation.


Lab Notes October 26th, 2016:

Today, we gave our second presentation of the chemistry portion, which you can check out in the link below. We learned that we need to give more background information in our presentations in the future. After the presentations, we examined the optimizations we completed in the last lab and found that during their transportation the water in the smaller petri dish spilled out and soaked our optimization papers (pictured to the left). This caused any yeast growth to be "washed away". We decided to complete an optimization with the same methods as last class but with half the amount water in the small Petri dish. We also transported the dishes ourselves, taking care not to allow the water to splash over the sides of the small dish into the large dish. Halfway through the lab, we received our 3D print but it was dropped and one of the tubes was broken (pictured to the left). We decided to go ahead with the creation of our PDMS product despite the broken tube, using it as a test mold to see if our device will be successful. We created our PDMS using a ratio of 10 parts PDMS base to 1 part curing agent and poured it into a large Petri dish. After it was poured, we found that the PDMS did not fill the dish enough so we folded up parafilm and placed it in the PDMS to increase the area filled (pictured to the left). Finally, we placed our 3D print into the PDMS to let it harden until the next lab, making sure it was not touching the bottom of the dish.

Lab Notes October 31st, 2016:

Today, we retrieved our optimization plates and found that they had been moved and the water had once again spilled over into the large plate (pictured to the right). Meanwhile, one of our group members worked on removing PDMS from the glassware tube in which it dried. We learned to mix PDMS in disposable plastic containers from now on to avoid this dilemma. We then worked on redoing our optimization again, using the same process as we did in the last to two labs, and got about halfway through the process before class ended. We also devised some additional precautions we will be taking to keep the water from spilling, including making sure to speak to our teaching assistants about not, under any circumstances, moving our plates, and labeling the plates even more thoroughly. Additionally, we worked on figuring out a chemical to dissolve our 3D device in our PDMS so the PDMS can have open channels in the shape of our device. The first chemical we are trying is 3 molar NaOH which will be tested to see if it dissolves the polymer by placing a piece of 3D printed material in the NaOH in an oven at 100 degrees Celsius.


Lab Notes November 2nd, 2016:

Today, we finished the optimization we began during the last lab, following the methods we had devised to keep the water from spilling over and washing away the yeast for the third time. These included speaking to the TAs about not moving our plates for any reason and labeling them more clearly. We also devised an additional plan of covering the small petri dish with parafilm with holes cut into it (pictured to the left). This will prevent the water from splashing over but still allow it to keep the environment moisturized. We recorded the optical density of the yeast we were using so we can replicate it in the future and accurately compare results (pictured to the left). Today, we used 3.1 which indicates an optical density of 0.6785 multiplied by our volume.  We also found out that the 3 Molar NaOH from the previous lab was able to dissolve the 3D print material (PLA plastic). This means we can use NaOH to dissolve the plastic from our PDMS device. We worked on redesigning our 3D print to fit into a smaller petri dish so the PDMS will be able to reach high enough on our device. This will be sent to the printer once it has been approved.

Lab Notes November 7th, 2016:

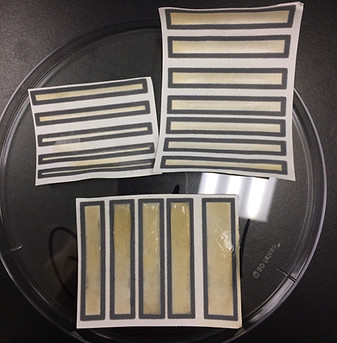
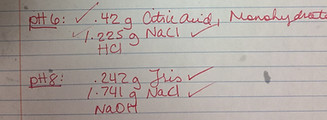
Today, we collected our three optimization plates from the lab and found that our new method of keeping the water from splashing over was successful. We found that the sheet with the widest channels dried out the least, but all stayed relatively moisturized. All three sheets are pictured to the right. To see if our yeast grew, we decided to place the sheets under a black light which would theoretically cause the GFP in the yeast to fluoresce. Unfortunately, it appeared that the wildtype yeast we used did not have GFP in it. We knew, however, that the mutant yeast we made earlier in class has GFP in it. We tested the mutant yeast to see if it would fluoresce by pouring it onto our sheet and putting it under the light. It showed fluorescence (pictured to the right). We decided to redo the optimization using the same process as last time, only this time we used mutant yeast with GFP. This will allow us to discern growth using the black light, making it much easier to compare growth in the different channels. We also decided to optimize the amount of agar we should be plating in our channels to get optimal yeast growth. We designed a new wax print with eight channels of the same width, 0.25 inches. We wax printed it and used the same process we use to optimize the channel width, except this time changing the amount of agar in the channels. We checked how much agar it took to completely fill the channel and found that it took about 250 microliters. Knowing this, we decided to begin with 220 microliters of agar and go up by increments of 20 microliters, ending with 360 microliters of agar in the final channel (which, as can be seen in the picture to the right, spilled over the channel). Finally, we plated our 10 microliters of yeast in each channel and placed the sheets in Petri dishes to grow.  We also received agar from group 2 with altered pHs of 2, 4, 6 and 8. They added various amounts chemicals and other ingredients, listed below, to create the acidic and basic solid agar (and are kind enough to share it with us). This will be used in our PDMS device.

Lab Notes November 9th, 2016:

Today, we collected our optimizations from the last lab and tested them under the UV light. We could see no growth under or out of the light, as can be seen on one of our optimization sheets to the left. This means that we were not able to optimize our channel length or amount of agar. We decided we are going to redo the optimization of the amount of agar but wait to optimize the channel width until we know how much agar to use. During this optimization, we will follow the same process as the last lab with 8 channels ranging from 220 - 360 microliters of agar except we will plate 50 microliters of yeast instead of 10 microliters in hopes that the yeast will have discernable growth. Additionally, we will make the wax barriers thicker and decrease the width of our channels to .15 inches.

Lab Notes November 14th, 2016:

Today, we gave our third presentations of the chemistry portion of the lab, check out ours above! Next, we executed the new optimization design we planned during the last lab (pictured to the right). The design is similar to our last agar optimization print but has slightly thinner channels and thicker barriers. We then plated the agar in each channel starting with 100 microliters and going up by 50 microliters each time, ending with 300 (pictured to the right). We repeated this process twice. Finally, we plated 50 microliters of yeast in each channel and placed the shePetrin petri dishes (using the same hydration methods as in the previous optmizaiton) and left the yeast to grow. We also got our 3D print back (pictured to the right). This print is similar to our last design except it is made to fit perfectly into a medium size petri dish. Next, we had to make the PDMS, but we were out of the necessary chemical initiator. After some research, we found that there was no sufficient replacement for the necessary initiator so we could not make the PDMS today.

Lab Notes November 16th, 2016:

Today, we got back our optimization from last lab (pictured to the left) and found that we had no discernable yeast growth. Though we were disappointed, we are happy with all the optimization data we have been able to collect over the course the experiment. For the rest of class, we turned in the rough drafts of our final paper and began work on our lab poster.

bottom of page